An Explanation of the Process From Start to Finish
Welcome to Valentine Quiltworks! Machine quilting is the process of layering together a quilt top, batting, and backing, and then stitching through all of the layers with a decorative design. Unlike your sewing machine where you move the quilt through the machine, the quilting machine moves over the quilt that is attached to a frame. There are many steps in this process, and attention to detail is very important for the highest quality finished product. Below I have explained the process that I use to transform a quilt top into a quilt!
The Consultation
Make an Appointment:
Congratulations! You have decided to have your quilt top professionally quilted, and you have come to the right place! Please contact me via phone or email, and I will answer any questions you may have. We will then set up an appointment for you to bring your quilt top and backing to my home studio. This is a good time to review the Quilt Prep page so your quilt top will be properly prepared!
I have a Gammill Statler Stitcher, a top of the line computer guided quilting machine. Since starting my business in 2006 I have taken many classes and spent long hours becoming proficient with the skills necessary to produce high quality machine quilting with exceptional attention to detail. I do everything myself, and as you will learn here, there is a lot more to my job than just pushing a button!!
Choose a Quilting Design:

When you arrive at my home for your appointment we will go into my quilting studio. We will lay your quilt top out, discuss who it is for, how it will be used, and ideas you may have. We will inspect your quilt together and discuss any issues that might cause problems during the quilting process, and identify any potential extra fees that might be incurred. This is a great teaching/learning opportunity! Then it's time to choose a quilting design. I have several books of designs, and I can get just about anything if I don't have what you want. There are thousands to choose from and it can be overwhelming. I have a lot of experience so if you prefer, I can make some suggestions.
Batting:

The next part of your visit is to measure your quilt, and choose batting. I will take a rough measurement, the final price is determined by the exact measurement of the quilt before it is quilted. I have several Quilters Dream products available and quilted samples to help with your decision. We will discuss the look that you want, the use of the quilt, and the type of batting you prefer. Please note: I no longer accept customer battings due to quality issues.
Thread:
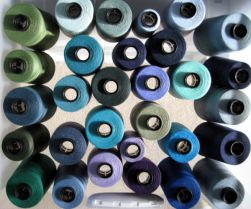
Quilting requires thread! I have hundreds of quality solid colors to
choose from, as well as many variegated threads. We will consider the colors in the
top and the backing, and whether you prefer the thread to blend, or show
as an accent. We will audition several colors, and you choose the
color you like!
Your Cost Estimate:
I will figure an estimate that will be very close to the final cost. We will discuss your timing expectations and estimate when your quilt will be finished. I will call or email when it is ready to be picked up! It can take anywhere from a few days to several weeks, depending on my backlog. Most of the time no deposit is required, and payment is due in full at the time of pickup.
The entire consultation process takes anywhere from 20 minutes to whatever! I enjoy getting to know my clients, and I do not rush!
The Quilting Process
Preparation:

Now my real work starts! First, I have to prepare the machine. That entails cleaning, oiling, changing the needle, and occasionally some serious maintenance. The machine is a $40,000 investment so it is important to take good care of it! Then I wind bobbins, thread the machine, and check the tension.

I start the computer setup for the designs you have chosen. For an edge to edge design I decide on the approximate size, number of repeats, and nesting. I also make sure the design does not become distorted. The exact size will be set after I have the exact measurements of your quilt, and it depends on the design, the proportions of your quilt, and to some extent, the size of the smallest pieces in the quilt. It is easier to just make everything as big as possible so it gets done faster. But I don't do that because I like to make sure the density is just right for your quilt, and there is plenty of quilting so it will last a very long time!
Pressing:

Measuring:

I carefully measure the quilt in several places, both width and length. Based on these measurements, I determine what the final dimensions of the quilt will be, and make slight adjustments to the measurements I entered into the computer earlier. Part of a quality quilting job is to keep everything straight and square all the way down the quilt. It is much easier to just put the quilt on the frame and quilt it into whatever shape it arrived in, but I want every quilt to be straight and square when it is finished!
Squaring:

After pressing, I carefully inspect the backing and check it to be sure it is square. That means the parallel sides are the same length, and the corners are square. I feel this is a necessary step to insure a quality product. I check every backing, and almost every one needs to be squared up, even just a little. If you fold the backing in half, ends even, it should hang perfectly straight. You need to check both directions, side to side and top to bottom.

The backing can be put on the frame unsquared, but it tends to pull, pucker and pleat, and I don’t want that to happen! The edges all need to be cut even and straight. The backing needs to be 4”-5” larger than the top on every side, or a total of 8”-10” longer and 8”-10” wider than the top.
Loading:

When I am satisfied that everything is just right, I mount
the backing on the machine. This involves locating the centers of the top and
bottom, and pinning them to the leaders. I roll it back and forth to be sure
the backing is straight and flat.
The batting is cut from a large roll, and it usually has a few wrinkles in it. I put it in the dryer on delicate for about 10 minutes, and it is much nicer to work with! This is another extra step, it takes more time but the result is a smoother finished quilt.

I lay the batting on top of the backing, smooth it out, and baste straight across the top. Then I line up the quilt top with this stitching line, and measure, and baste it down. I position the sides of the quilt top so that they are perfectly square to the top edge, and baste down the sides. The smoothing, squaring, and basting, takes place every time I roll the quilt top after every row of quilting is finished, which is every 13"-20" of the quilt length, depending on the design height. Many quilters do not square up every row, because it takes time. But that can lead to problems at the bottom of the quilt, in the form of an uneven quilt bottom. I want that bottom edge to be perfectly straight and square, and the same width as the rest of the quilt!
Quilting:

Wow, it’s finally time to push the button! Many quilters with computer guided machines will start the machine quilting a row and then do something else while the row stitches. I NEVER leave your quilt unattended! You are paying me to quilt your quilt, and I take it very seriously. This is my chance to be sure your finished quilt is the best it can possibly be, and make sure everything stays flat, square and straight.

I stand by the machine the entire time it is running, for hours at a time, and I am able to manipulate the fabric with my hands and get it to stay exactly where I want it. This is especially important if your quilt has a bit of fullness anywhere in the piecing or the borders, and this is very common!
When the row is finished, the machine stops, and I have to roll, smooth, straighten, square, and baste. Then I take a peak underneath to be sure everything looks good on the back, and push the button again….. when I finally reach the bottom edge of the quilt I baste straight across, manipulate everything into place, and quilt the last row.
Final Inspection:

When the quilting is finished, the quilt is unpinned from
the leaders and I trim all of the excess quilting thread ends. I inspect your
quilt, and if requested, I will trim off the excess backing and batting.
The quilting process is finally done! This whole process takes anywhere from several hours to several days, depending on the size of your quilt and the complexity of the quilting. Some people can do it faster if they skip the extra steps. I am meticulous and want your finished quilt to be of the highest quality possible, and that takes extra time!
Thank you for taking the time to read this, I hope you have
learned something about all of the steps involved in the quilting
process! I look forward to meeting you soon!
Email: ValentineQuiltworks@gmail.com
©Copyright 2006-2021 Valentine Quiltworks
No comments:
Post a Comment